Please Note This forum exists for community support for the Mango product family and the Radix IoT Platform. Although Radix IoT employees participate in this forum from time to time, there is no guarantee of a response to anything posted here, nor can Radix IoT, LLC guarantee the accuracy of any information expressed or conveyed. Specific project questions from customers with active support contracts are asked to send requests to support@radixiot.com.
Arduino and Mango Step by step working example
-
-
Buy or make a Arduino
-
Download the latest Arduino software I'm using 0020. http://arduino.cc/en/Main/Software
-
If you are using Arduino Duemilanove or a similar board that runs off USB you’ll have to install the USB drivers. You can find them in the Arduino folder you just downloaded.
-
plug in a TMP36 temp sensor as shown here: http://tinyurl.com/plbx38
Plug it into Analog port 3 instead of 0 as shown in the link. -
Grab the modbus library from http://www.tucsni.nl/jee/ModbusSlave.zip
you should check his site http://www.tucsni.nl/jee/ he actually says to use the new version here: http://sites.google.com/site/jpmzometa/arduino-mbrt/arduino-modbus-slave
but I havent tested it. -
Unzip modbusslave.zip to your_arduino_install\libraries\ModBusSlave
-
open the arduino IDE
-
Paste the following code:
#include <ModbusSlave.h> //TMP36 Pin Variables int temperaturePin = 3; //the analog pin the TMP36's Vout (sense) pin is connected to //the resolution is 10 mV / degree centigrade //(500 mV offset) to make negative temperatures an option int temptest = 1 ; //Arduino sketch example with 2 holding regs: void setup() { /* Modbus setup example, the master must use the same COM parameters */ /* 115200 bps, 8N1, two-device network */ // regs[MB_REG0]=153; // regs[MB_REG1]=456; init_mb_slave(115200, 'n', 0); } void loop() { /* This is all for the Modbus slave */ start_mb_slave(MB_SLAVE, regs, MB_REGS); /* your code goes here */ float temperature = getVoltage(temperaturePin); //getting the voltage reading from the temperature sensor temperature = (((temperature - .5) * 100)*1.8) + 32; //converting from 10 mv per degree wit 500 mV offset //to degrees ((volatge - 500mV) times 100) // Serial.println(temperature); // Serial.println(regs[MB_REG0]); //printing the result // delay(100); temptest = (temperature); regs[MB_REG0]=temptest; /* handle write event */ if (written.num_regs) { /// .... written.num_regs=0; } } /* * getVoltage() - returns the voltage on the analog input defined by * pin */ float getVoltage(int pin){ return (analogRead(pin) * .004882814); //converting from a 0 to 1024 digital range // to 0 to 5 volts (each 1 reading equals ~ 5 millivolts }-
upload the code to your Arduino.
-
Install Mango
-
Create a new data source.
[url=http://postimage.org/image/1kmj3h7pg/]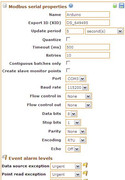
-
Create a new datapoint
[url=http://postimage.org/image/1syvr8io4/]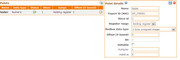
-
you should now be seeing the current temperature updating every 5 seconds on your datapoint.
You can breathe hard on your tmp36 to see the temp go up in mango.
have fun.
hope this helps somebody as it took me about 2 days of scouring the net to make it finally work. -
-
Nice. Thanks.
-
Hello.
I'm trying to compile the sketch buy i get an error in "init_mb_slave(...)" not declared function.
I think that the library i've got is newer because in new examples the configuration is done in this way:
mbs.configure(SLAVE,BAUD,PARITY,TXENPIN);
Can you comment this issue?
thanks -
I would use the library here: http://www.tucsni.nl/jee/ModbusSlave.zip
other than that I have no idea. probably question better for the arduino forums as well. -
Sketch for new library from http://sites.google.com/site/jpmzometa/arduino-mbrt/arduino-modbus-slave
With this code you can:
-See the status of pin 2 in mango (MB_REG0)
-set the status of pin 13 with mango (MB_CTRL)use offset 0,1,... in mango to use MB_REG0, MB_CTRL, MB_TIME,...
#include <ModbusSlave.h> /* First step MBS: create an instance */ ModbusSlave mbs; /* slave registers */ enum { MB_REG0, MB_CTRL, /* Led control on, off or blink */ MB_TIME, /* blink time in milliseconds */ MB_CNT, /* count the number of blinks */ MB_REGS /* total number of registers on slave */ }; int asdf=1; int regs[MB_REGS]; int ledPin = 13; void setup() { /* the Modbus slave configuration parameters */ const unsigned char SLAVE = 1; const long BAUD = 9600; const char PARITY = 'n'; const char TXENPIN = 1; /* Second step MBS: configure */ mbs.configure(SLAVE,BAUD,PARITY,TXENPIN); pinMode(ledPin, OUTPUT); pinMode(2,INPUT); } void loop() { asdf=digitalRead(2); regs[MB_REG0]=asdf; /* Third and las step MBS: update in loop*/ mbs.update(regs, MB_REGS); if(regs[MB_CTRL]==1) digitalWrite(ledPin,1); else digitalWrite(ledPin,0); } -
Nice I was struggling with setting values. Ill have to give this a try.
-
Hi,
I have a one question. I use the modbus serial for comunication. It is script:
#include <ModbusSlave.h>
/* First step MBS: create an instance /
ModbusSlave mbs;
/ slave registers */
enum {MB_CTRL, /* Led control on, off or blink /
MB_TIME, / blink time in milliseconds /
MB_CNT, / count the number of blinks /
MB_REGS / total number of registers on slave */};
int regs[MB_REGS];
int ledPin = 13;void setup()
{/* the Modbus slave configuration parameters /
const unsigned char SLAVE = 1;
const long BAUD = 9600;
const char PARITY = 'n';
const char TXENPIN = 1;
/ Second step MBS: configure */
mbs.configure(SLAVE,BAUD,PARITY,TXENPIN);
pinMode(ledPin, OUTPUT);}
void loop()
{
/* Third and las step MBS: update in loop*/
mbs.update(regs, MB_REGS);
if(regs[MB_CTRL]==1)
{
digitalWrite(ledPin,1);
}
else{
digitalWrite(ledPin,0);
}
}
But i want a blink effect in led and i modified the script:
if(regs[MB_CTRL]==1)
{
digitalWrite(ledPin,1);
delay(3000);
digitalWrite(ledPin,0);
delay(3000);
}
else{
digitalWrite(ledPin,0);
}
}Well, when i set the bit 1, the led blink but it don't enter in the else.
Anyone had the same problem with supervisory and script?
tank's
*sorry, my english is very weak.
Hello! It looks like you're interested in this conversation, but you don't have an account yet.
Getting fed up of having to scroll through the same posts each visit? When you register for an account, you'll always come back to exactly where you were before, and choose to be notified of new replies (either via email, or push notification). You'll also be able to save bookmarks and upvote posts to show your appreciation to other community members.
With your input, this post could be even better 💗
Register Login